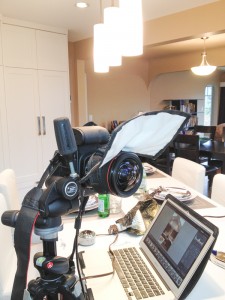
Hooding the Canon TS-E 17
I make good use of my Canon TS-E 17mm, especially when shooting straight on into small interior spaces like bathrooms, kitchens, and other tight spots that we Vancouver architectural photographers are challenged with shooting on a regular basis. It's a great lens when used with deft hands, and the optical quality is amazing. While I notice a bit of softness using the 1.4 TC, it's still far and away better than the old TS-E 24, though the TS-E 24 Mk II is on my "stuff to buy before the HST comes off" list of upgrades...that's assuming I don't move to medium format first.
But as amazing a piece of glass as the TS-E 17 is, there's one little problem: that "pregnant" front element. While it's less flare-prone than one might think by looking at it, I still run into problems particularly if there's a small, intense light source nearby--like a PAR spot or high-wattage MR16. When shooting the Yale St. Kitchen featured as Photo of the Week a couple of weeks ago, the combination of several PAR spots and the bright above-counter lighting made for a serious flare problem. Since there is no official hood (and even if there was one, it would be little more than decorative most of the time), I've often used the black side of a Honl Speed Gobo, handheld, as a flare card. This wasn't going to work here, because I was planning to shoot tethered from a ways away to avoid having myself reflect in several highly reflective surfaces. What to do?
In one of those blinding flashes of insight that one is sometimes blessed with on location, I caught sight of the small Rogue FlashBender in my grip bag and decided to use it for a hood by wrapping its elastic around the mounting collar of the TS-E. It works, mostly. A few caveats:
- The strap is snug on the lens collar (though nothing that either a piece of double-sided Velcro, or a bit of [ab]use won't fix).
- This means that you will jar your lens slightly when putting the FlashBender on. So, lock your shift setting in before mounting the FlashBender and bending it into position. (If you're careful, you can hold your focus when doing this.)
- The strap will cover your shift controls, so shift and compose first before putting the FlashBender on. (And lock your shift setting. You've been told twice now.)
- It often seems easier to mount the FlashBender, then look into the front element of the lens for points of light, and adjust the FlashBender from the front before finally checking it through Live View for focus, lack of vignetting, etc.
Interestingly, I've always found the small FlashBender to be one of those "mostly wasting space in my grip bag" items, since if I'm going to be using a FlashBender as a snoot or bounce, I usually use the large size instead--so this lighting modifier has finally found its true calling in my camera bag: as a flexible hood.

